Windows on RAM disk

In our age, we all love speed. We love fast transport, fast delivery services, high-speed Internet. And, of course, fast computers. We have a sixth sense, which we detect milli / microsecond delays. Often there is a desire to disperse something.
But what to overclock? What hinders our work and creates discomfort? Our processors operate at multi-gigahertz frequencies, drive electrons at relativistic speeds. Do not lag behind them and memory with data buses. But as soon as it comes to the periphery ... a leisurely macrocosm lurks here. It does not juggle electrons. Be so kind as to wait until the disc in the DVD-drive unwinds, until the next byte from the I / O port comes, until the HDD brings its read head to the right place on the plate. Well, we use DVDs and COM ports infrequently (if at all), but the HDD ... We still have the OS on it, and there are thousands of files in it, and who knows at what point they may be needed. Write the log, load the dll, then the font, then the registry, then something else. And on some HDDs, multiple simultaneous downloads can lead to
It would seem that here we must be helped by a team of glorious defenders of the universe called File Cache, Prefetch, Superfetch, and their assistant ReadyBoost. Yes, they help, but often it happens that they miss - and then you have to watch the waiting cursor.
But what is it? I hear noise in the hall, they are chanting there - SSD! SSD! What can I say, SSD - definitely cool. 200-300mb / s and even higher, almost instant access, no noise ... well, just miracles. But about the SSD, and so a bunch of topics are written, and since I can overclock ... maybe there is something faster? Hm Do we have anything faster than flash memory in SSD? SSD more expensive? Raid0 of SSD? And even faster? RevoDrive? ABOUT! DDR3! (Who there shouted "L1 cache"? Comedian!)
We know about RAM disks, sometimes we use them as temporary storage - so that it works faster. So if you take and move the whole system to RAM? It should work much faster than any SSD, and even more so faster than the HDD, right? Or should the file cache give us a similar effect? Perhaps the difference will not be noticeable. So why not try it? In my computer, 16 GB of RAM, enough for everything and still remains. It would be nice to use the rest. Go!
0) Checklist:
- 16 GB RAM, or more. Although you can try and 8. But 4 is enough except for XP.
- Grub4Dos
- Wincontig
- BootIce
- Partition Wizard or something similar for cloning partitions,
- Firadisk driver
- Windows x64 distribution (you can also x86, but there will be no more than 3.5GB of free memory). I checked on WinXP (x86), Win7, Win8. The “lightweight” versions are highly desirable, because the memory of RAM is not rubber.
- installed and running Win7 (or Win8)
1) Attention! if you have several hard drives - in order to avoid problems, do everything that follows on the HDD, which is different from the system one. System is generally better not to touch and, if possible, disconnect, and install Win7 for experiments on another disk. I do not know your configuration, some actions may break your download. It would be nice to pre-stock a recovery LiveCD / USB, or at least the Windows installation disc, and also at least understand what you are doing and how to get everything back. For confidence, you can first conduct an experiment on a virtual machine.
First, a little theory. Grub4Dos is a boot manager for organizing multiboot systems. Among other things - it can create virtual devices and work with them as well as with ordinary disks. A virtual disk can be mounted on a file, or in memory. When mounted in memory, the contents of the source file is copied into memory and further work is already being done from there. As a source, you can use .ima files (floppy images), .iso (CD / DVD images) and also .img (RAW HDD images). Win7's native .vhd files (fixed-size, non-dynamic and non-differential) are the same .img, but with a small header and can also be connected.
Virtual discs created with Grub4Dos are available in real mode. Windows will only see them if there is a special driver. Such drivers exist - this is Firadisk (works with disks in memory) and WinVBlock (works with images in files). If the OS has the correct driver, it can work with the disks created in Grub4Dos. Unfortunately, the drivers are not signed and for their work in the x64 system you need to disable the driver signature verification. Thus, the course of action: prepare the VHD with Windows installed, where we disable signature verification, install Firadisk, then load the VHD before loading Windows through Grub4Dos and forward.
First, install on our machine Grub4dos. Start BootIce, select the disk from which we will boot, put Grub4dos in the MBR, put the grldr and menu.lst files in the root of any section.
In menu.lst we write:
# Win7 title Windows (previous) find --set-root /bootmgr chainloader /bootmgr The “find --set-root” command searches for the specified file and makes the first partition where this file was found to be current. Therefore, check if you have extra bootmgr files in other sections. If you know that the system disk is hd0, you can write directly - chainloader (hd0,0) / bootmgr
Then, using computer management and disk device management, we create a fixed-size VHD file in the root of our working partition that’s 10 (it’s possible to have enough for installation), format it in NTFS, disable the disk and defragment its file with Wincontig.
Now you need to get from this VHD a disk image with Windows ready for work, drivers for your hardware and support for booting from VHD. This can be achieved in different ways.
Method 1, recommended. For Win7 Corporate and Ultimate editions, and for Win8. System installation in VHD by regular means.
Read more
After downloading the installer, press Shift-F10, and execute:
where "D: \ win7.vhd" is the path to the VHD file. The drive letters may differ from your main system, you can see them by running, for example, notepad and opening the file selection dialog in it.
We continue, VHD will appear in the list of devices for installation. After installation, a new entry will appear in your Windows boot menu and will appear by default. This is the download in VHD.
diskpart select vdisk file="D:\win7.vhd" attach vdisk where "D: \ win7.vhd" is the path to the VHD file. The drive letters may differ from your main system, you can see them by running, for example, notepad and opening the file selection dialog in it.
We continue, VHD will appear in the list of devices for installation. After installation, a new entry will appear in your Windows boot menu and will appear by default. This is the download in VHD.
Method 2. For all systems. Installation in a separate section on the disk. Install Windows there as standard, and at the very end, after all the preparation, we clone the partition in the VHD.
Method 3. For all systems. Install the system in VHD on a virtual machine, do all the preparation, and then boot from this VHD on real hardware. There is a possibility of problems with hardware drivers when transferring to real hardware. It is better to perform sysprep before the transfer.
Method 4. For WinXP. Use the WinVBlock driver.
Read more
We add these three entries to menu.lst.
What is being done here:
-connects winxp.vhd as a hard disk (the VHD file must be defragmented using WinContig, otherwise Grub4Dos will refuse to connect it)
-Connects to the floppy image winvblock.ima with drivers WinVBlock, loaded into memory.
-connect the image of the installation CD xp.iso, loaded into memory.
There are two entries for installation, since WinXP installation consists of 2 stages - text and graphic mode. First choose TXT, with the second boot - GUI. The only difference is where you boot from - from a CD or HDD.
- press F6 and choose the driver is not necessary, integrate into the distribution too, it is enough to have it on the floppy disk image.
After installation in Grub4Dos, select Boot and boot into the system that is installed in the VHD.
For Win7, and even more so for x64 editions, it won't work that easily. Need a special, street magic .
However, I never managed to get WinVBlock to work with Win7. Maybe you can do it.
title Start - TXT-mode XP Setup vhd find --set-root /winxp.vhd map --mem /winvblock.ima (fd1) map --mem /winvblock.ima (fd0) map /winxp.vhd (hd0) map --mem /xp.iso (0xff) map --hook chainloader (0xff) title Continue GUI-mode XP Setup vhd find --set-root /winxp.vhd map --mem /winvblock.ima (fd1) map --mem /winvblock.ima (fd0) map /winxp.vhd (hd0) map --mem /xp.iso (0xff) map --hook root (hd0,0) chainloader /ntldr title Boot XP vhd find --set-root /winxp.vhd map /winxp.vhd (hd0) map --hook root (hd0,0) chainloader /ntldr What is being done here:
-connects winxp.vhd as a hard disk (the VHD file must be defragmented using WinContig, otherwise Grub4Dos will refuse to connect it)
-Connects to the floppy image winvblock.ima with drivers WinVBlock, loaded into memory.
-connect the image of the installation CD xp.iso, loaded into memory.
There are two entries for installation, since WinXP installation consists of 2 stages - text and graphic mode. First choose TXT, with the second boot - GUI. The only difference is where you boot from - from a CD or HDD.
- press F6 and choose the driver is not necessary, integrate into the distribution too, it is enough to have it on the floppy disk image.
After installation in Grub4Dos, select Boot and boot into the system that is installed in the VHD.
For Win7, and even more so for x64 editions, it won't work that easily. Need a special, street magic .
However, I never managed to get WinVBlock to work with Win7. Maybe you can do it.
Method 5. For Win7 any editions. We use VBoot . This is also a driver that allows you to boot into VHD. It is signed and allows you to install x64 systems. Unfortunately, the paid, but available demo version, which is enough to install.
Read more
We set the time for 2011. (otherwise, download BSOD when loading)
Put the folder VBoot, vbootldr and vbooldr.mbr in the root of the disk.
In vboot \ grub \ grub.cfg we look for the records of Windows 7 VHD and Windows 7 Install and change to these:
The label of the partition on which the win7.vhd and win7.iso files are located (Win7 distribution) is changed to SYS (although it doesn’t matter which one, just to match). For some reason my Vboot does not want to recognize the paths of the form (hd0,1). You can also refer to the UUID, but the labels are simpler.
Add a record to menu.lst:
Reboot. In Grub4Dos, go to Vboot, and in it - in Windows 7 Install. After downloading the installer, press shift-F10, launch the notepad, open the file selection dialog and look at which letter the Vboot drive is on. Suppose it is D :. We return to the command line and write for 64-bit editions -
Put the folder VBoot, vbootldr and vbooldr.mbr in the root of the disk.
In vboot \ grub \ grub.cfg we look for the records of Windows 7 VHD and Windows 7 Install and change to these:
menuentry "Windows 7 VHD" { vboot harddisk=(LABEL=D)/win7.vhd } menuentry "Windows 7 Install" { vboot harddisk=(LABEL=SYS)/win7.vhd cdrom=(LABEL=SYS)/win7.iso boot=cdrom } The label of the partition on which the win7.vhd and win7.iso files are located (Win7 distribution) is changed to SYS (although it doesn’t matter which one, just to match). For some reason my Vboot does not want to recognize the paths of the form (hd0,1). You can also refer to the UUID, but the labels are simpler.
Add a record to menu.lst:
title VBoot find --set-root /vbootldr.mbr chainloader /vbootldr.mbr Reboot. In Grub4Dos, go to Vboot, and in it - in Windows 7 Install. After downloading the installer, press shift-F10, launch the notepad, open the file selection dialog and look at which letter the Vboot drive is on. Suppose it is D :. We return to the command line and write for 64-bit editions -
D:\vboot\tools\amd64\vbootctl setup or for 32-bit D:\vboot\tools\x86\vbootctl setup This will install the Vboot driver and mount the virtual devices. Then we continue the installation on the VHD that appeared in the list of devices, and we boot via the Windows 7 VHD entry. After the final configuration (see below), delete the Vboot with the vbootctl uninstall command and then you can return the time to the current one. And now Windows is installed and booted.
First, let's check via Bootice whether the Grub4Dos installer from the MBR has demolished us. If demolished - set again.
Second, check if there is a Windows boot loader on the system partition — the bootmgr file and the Boot folder (in the case of Win7 / 8). They have hidden and system attributes, enable their display. If not, then the installer saw this bootloader somewhere else and added his download option there, or he created a hidden 100MB partition and put everything there. This is not the case, we need a bootloader on the system partition. Therefore we create it:
bcdboot c:\windows /sc: And disable driver signature verification in it:
bcdedit /store c:\boot\bcd /set {default} testsigning ON bcdedit /store c:\boot\bcd /set {default} nointegritychecks ON bcdedit /store c:\boot\bcd /set {default} loadoptions DDISABLE_INTEGRITY_CHECKS In the current loader, we also disable:
bcdedit /set testsigning ON bcdedit /set nointegritychecks ON bcdedit /set loadoptions DDISABLE_INTEGRITY_CHECKS Reboot to enable the test mode and install the Firadisk driver: hdwwiz (hdwwiz.cpl in XP), install manually, install all devices from the disk and select the .inf file.
4) Now we make all the usual manipulations: install the remaining drivers, set up the hardware, network, desktop, install DirectX / .NET / vcredist, and the like. Transfer the paging file to another partition, delete the temporary files and compress the system partition using NTFS. We're still in the memory of the ship, every megabyte counts. I got about 4 GB for Win7.
Now we shrink the VHD to an acceptable size (I added a couple of GB, just in case, it turned out 6). By the way, how to determine the available size? On the Grub4Dos menu screen in the top line there is a line like Mem: / 639K / 13582M / 512M.
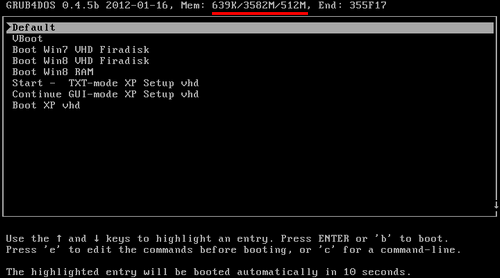
These are available areas of memory in which he can load an image. But it can only load the entire image into one area, so the size of the new VHD should not exceed the largest value from this line, otherwise you will get an error.
We load into the previous Win, mount win7.vhd, create another vhd of a finite size and copy one into another through a partition editor like Partition Expert. (If you decide to follow the installation method 2 - now is the time to clone your system partition in the VHD) Replace the old file with a new one, defragment again via Wincontig. Let's try to boot into the new VHD. Problems should not arise.
Instead of all this, you can use a special program to cut and compress an already installed Win7 - VHD_W7_Compact . It is claimed that it can cut down to 600mb.
5) It's time to boot from RAM! Add a few more lines to menu.lst:
title Boot Win7 from RAM map --mem /win7.vhd (hd0) map --hook chainloader (hd0)/bootmgr (for XP, instead of / bootmgr, write / ntldr)
Finally, boot by selecting Boot Win7 from RAM.
A minute or two of VHD is copied into memory, a few seconds of loading and ... a desktop appears. Hurray, the seven work without using HDD, and it seems to work quite well.

You can also add a clever way to download Win7 directly from VHD while saving changes:
title Boot Win7 from VHD (Firadisk) find --set-root --ignore-floppies /win7.vhd map /win7.vhd (hd0) map --heads=2 --sectors-per-track=18 --mem (md)0x800+4 (99) map --hook write (99) [FiraDisk]\nStartOptions=disk,vmem=find:/win7.vhd,boot;\n\0 rootnoverify (hd0,0) chainloader /bootmgr For this to work, in the .inf file of Firadisk you need to replace “LoadOrderGroup = Boot Bus Extender” by “LoadOrderGroup = SCSI miniport”.
Here we make Firadisk work with the image not in memory, but on disk. It noticeably slows down, so it is better to still use the installation method 1 with the native VHD boot.
Here is another article about loading Win7 from RAM.
Well, with Linux you can try it like this .
I have been using this configuration on my home computer since last fall, for more than six months already. I will try to streamline the subjective impressions:
Pros:
+ Indeed, it works quickly. Programs from memory start instantly (which is obvious). There are no complaints about the stability of the work - the computer has been running for weeks and months.
+ No extra sounds from the HDD.
+ The concepts of "wear", "the number of read / write cycles" - for the RAM are irrelevant.
+ Side plus - turned out to be an immutable, non-killing system. You can install any program curves at once (for example, to restore USB flash - they usually install their drivers, which are difficult to dig out later) without risking anything to spoil. Reboot and how nothing was.
+ Side plus - VHD is cool. No more disk partitions, just files that are elementary copied / moved / deleted / backed up without any acronis / paragons / gparted.
Minuses:
- Honestly, the difference with a good SSD is not noticeable in speed. In both cases, there is nowhere to find fault with speed.
“Of course, precious memory is being spent.” Take out and put 6-8 gigabytes. In my case, the balance of 10GB is enough for me, and if it is not enough, you can boot in VHD mode.
- 6-8 GB for Windows 7 - yet very little. Some Windows Update updates will quickly eat up the whole place. And still want to install your favorite programs ... someone and 100GB of the system partition may be small (and some advocate not to break disks into sections at all). In my case, I placed only the most popular programs on the system partition, and keep everything else in the form of portable versions on the HDD. Still, this is a home computer, there are no monsters greedy for memory and space on the system disk like SQL Server, Visual Studio, Adobe CS, MS Office (there is enough portable LibreOffice). So far so good.
- temp has to be transferred to another disk. Some installers are not asking anyone to unpack it there and there may not be enough free space.
- It is necessary to turn off driver signature verification. There's nothing to be done.
- There is another side to indestructibility. For each change in the settings, for each update, for each installation of the program / driver for permanent use, it is necessary to reboot into the VHD operation mode - otherwise everything will be lost upon reboot. If some of your program stores something of its own in the profile (for example, the games keep saving there), then it is desirable to transfer the profile to another section.
- Loading 6-8gb in memory takes a lot of time - you do not boast about 10 second loading.
- For obvious reasons, it is impossible to use hibernation. But the system goes to normal sleep and wakes up normally.
But I hear screams again in the hall. “And they won’t think of anything, just not to buy SSDs!”, “But this is nonsense, throwing out so much memory for nothing!”, “Are there any left-handed curves to set firewood?”, “Don't!”. I agree. I would not recommend such an approach. It is rather an interesting experiment than a working solution. Thank you for your attention, now you can post pictures with bread trolleybuses.
PS A big thanks to the developers of Firadisk and WinVBlock - karyonix and Shao Miller, as well as the reboot.pro forum.
More posts:
All Posts